
A few months ago, I spied these wings in Elsie Marley's links, and I knew I wanted to make a pair for my girls. I'm sorry to say the project was added to my never-ending list of un-tended inspiration...until now. My girls decided to be colorful birds for Halloween. Perfect!

These wings are very simple to make. I started with six fat quarters my wee girl picked out. She chose six different patterns in six different colors, which seems perfect! (word to the wise: these wings are real fabric-guzzlers. you might want to cut up some vintage printed sheets as Kat did and save yourself some trips to the fabric store or raids on your stash...)
I cut those fat quarters into 3 inch strips (length is about 19 inches or so). Then I folded each strip accordion-style (or to be more accurate, in half in half in half again to give me eight layers); each pile was approximately 2" x 3". With sharp sewing shears (say that 3 times fast!), I cut a curve along the sides and bottom edges, leaving the layers connected at the top by an inch or so. Unfold and voila: a row of fabric feathers! (lesson learned: cut taller strips leaving a 1.5"-2" uncut so the feathers won't overlap so heavily, allowing the fabric pattern to show and you to save some work and meterage)

Making the wing base is easy too. Measure the child from the middle of the back to the wrist. My 3.5 year old measures 40cm; my 6 year old measures 50cm. If you want to make a pattern on newspaper (or you could just measure and cut the fabric directly), just make a 90 degree angle, each side the length you need. Then connect the ends with a curve. Fold the fabric in half so you only have to cut once to get 2 wings. Done.

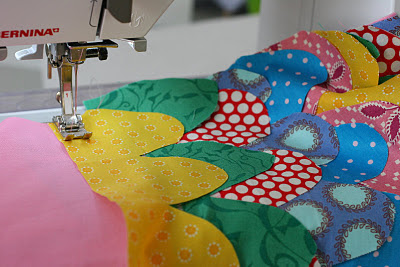
Starting at the outside edge, sew on one row of feathers at a time. I used a zigzag stitch since the fabric was all raw edges, but I really don't think that was necessary (it used up quite a lot of thread). The raw edges will indeed fray over time, but I think that's all right. More feather-y, yes? Keep sewing, one row at a time until you get to the very top. If you are a bit worn out with sewing by then or if you are running out of fabric feathers, you may want to cut a large patch with feathery edges to finish the top.
When both wings are complete, sew a ribbon along the top edges to join them. Then sew elastic loops at each end for wrists and attach in the middle a ribbon with velcro sewn on the ends to wrap around the child's neck (thank you, Artful Parent, for these suggested modifications!). The original pattern called for all ribbon here, but tying and untying is tedious for children and I don't love the idea of tied ribbon around their necks.

Fabric wings.
They take ages to sew.
They guzzle fabric.
They are beautiful!
I highly recommend you work some up for a little person (or heck, even a big person) you love.
Watch their imaginations take flight!

No comments:
Post a Comment